
TL;DR: Bubble Stripe Integration in 2026
Install the official Bubble Stripe plugin and paste your API keys. Bubble handles test vs. live mode automatically
Need it done faster? our Bubble developers to build it for you.
Use Stripe Checkout for the fastest setup: one-time payments and subscriptions work out of the box
For multi-item charges, use Bubble's API Connector to create Checkout Sessions with multiple line items
Need saved cards, marketplace payouts, or custom checkout UIs? Use the Stripe.js plugin or go direct with the API Connector
Set up webhooks to keep Bubble in sync with subscription changes, failed payments, and cancellations
This guide covers plugin setup, payment workflows, subscription billing, webhooks, testing, and going live
What You Need Before You Start
Before you integrate Stripe with Bubble, make sure these four pieces are ready. You won’t need to write any code-but skipping a step here can cost you time later.
1. A Bubble app
Head to bubble.io, create a new app, and start with a blank canvas.
You can use either the development or live version. Bubble will handle the right Stripe keys for each environment automatically.
2. A Stripe account
Go to stripe.com and sign up (or log in).
Once inside:
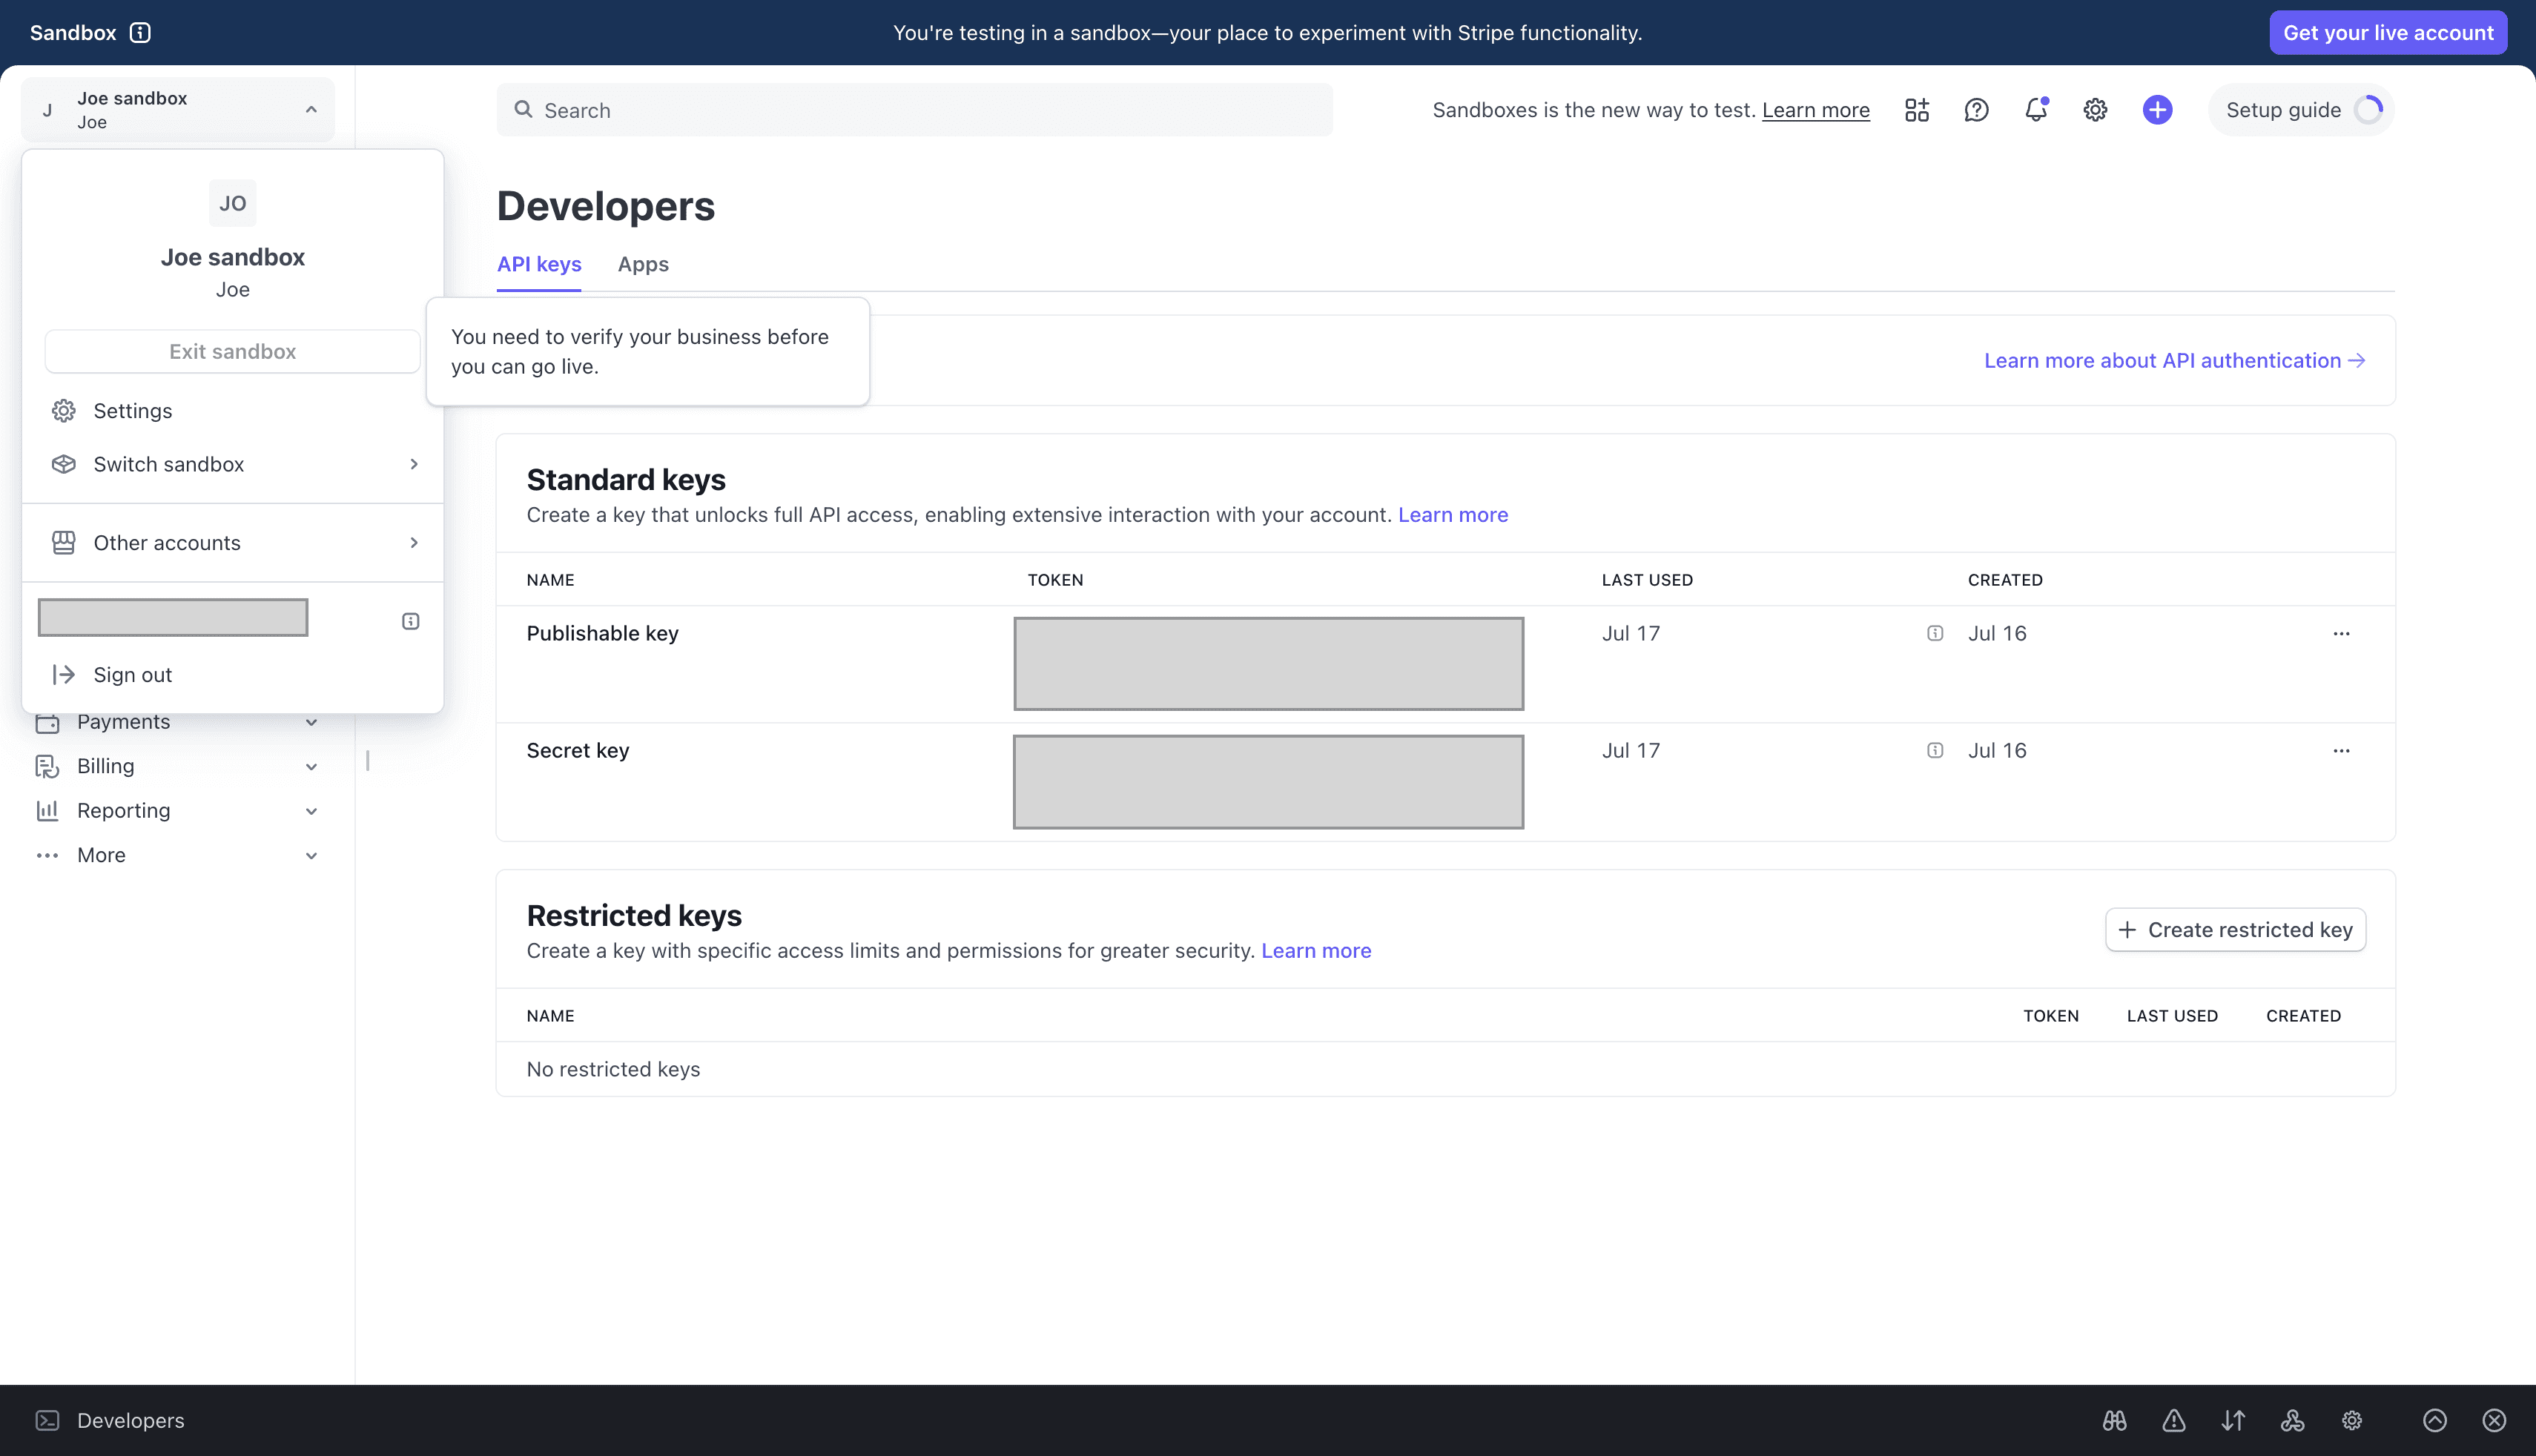
Go to Developers → API Keys
Copy your Test Publishable Key
Copy your Test Secret Key

You’ll paste both into Bubble later.
Stick with test keys for now. Stripe lets you simulate real payment flows using fake cards (which we’ll cover shortly).
3. Set Up Your Pricing in Stripe
Before building anything in Bubble, get clear on your billing model.
Stripe can handle one-time charges, subscriptions, trials, metered usage, you name it. But you need to define what you're building for upfront.
Think of this step as creating your products in Stripe, not in Bubble.
You’ll want to set this up if:
You’re using Stripe Checkout
You’re offering subscriptions
You want to send invoices or support multiple pricing tiers
You care about clean reporting inside your Stripe dashboard
If you're only doing one-off charges in Bubble (like charging a custom amount without a predefined product), you can technically skip this.
But for most apps, creating Products and Prices in Stripe keeps your setup clean, trackable, and scalable.
4. Create a Product and Price in Stripe
To start charging users through Bubble, you’ll need to set up a Product and at least one Price in Stripe.
Step-by-step:
Go to your Stripe Dashboard
Click “+ Add product”
Give it a clear name like “Pro Plan” or “Template License”
Description is optional, but helpful for internal tracking
Under Pricing, click “Add price”
Choose One-time for a single charge (e.g. a digital download)
Choose Recurring for subscriptions (monthly, yearly, etc.)
Set your price (e.g. $19.00)
If recurring, choose the billing interval
Want free trials or tiered pricing?
Stripe handles those inside the Price object - you won’t need workarounds in Bubble.
Example:
Product: Premium Plan
Prices:
$19/month
$190/year
$1 trial (one-time or recurring with a trial period)
Stripe will generate a Price ID like price_1OabcXYZ...
This is the ID you’ll use in Bubble when triggering:
Subscribe the user to a planStart a Stripe Checkout session
Pro tip: Don’t hardcode prices in Bubble.
Store the Stripe Price ID in your database and reference it in workflows. That way, pricing updates only happen in Stripe, not across your app logic.
If you're planning multiple pricing tiers, set them all up now. A solid Stripe structure makes your Bubble workflows simpler and easier to scale.
Install the Stripe Plugin in Bubble
To connect Stripe with your Bubble app, install the official plugin and add your test keys.
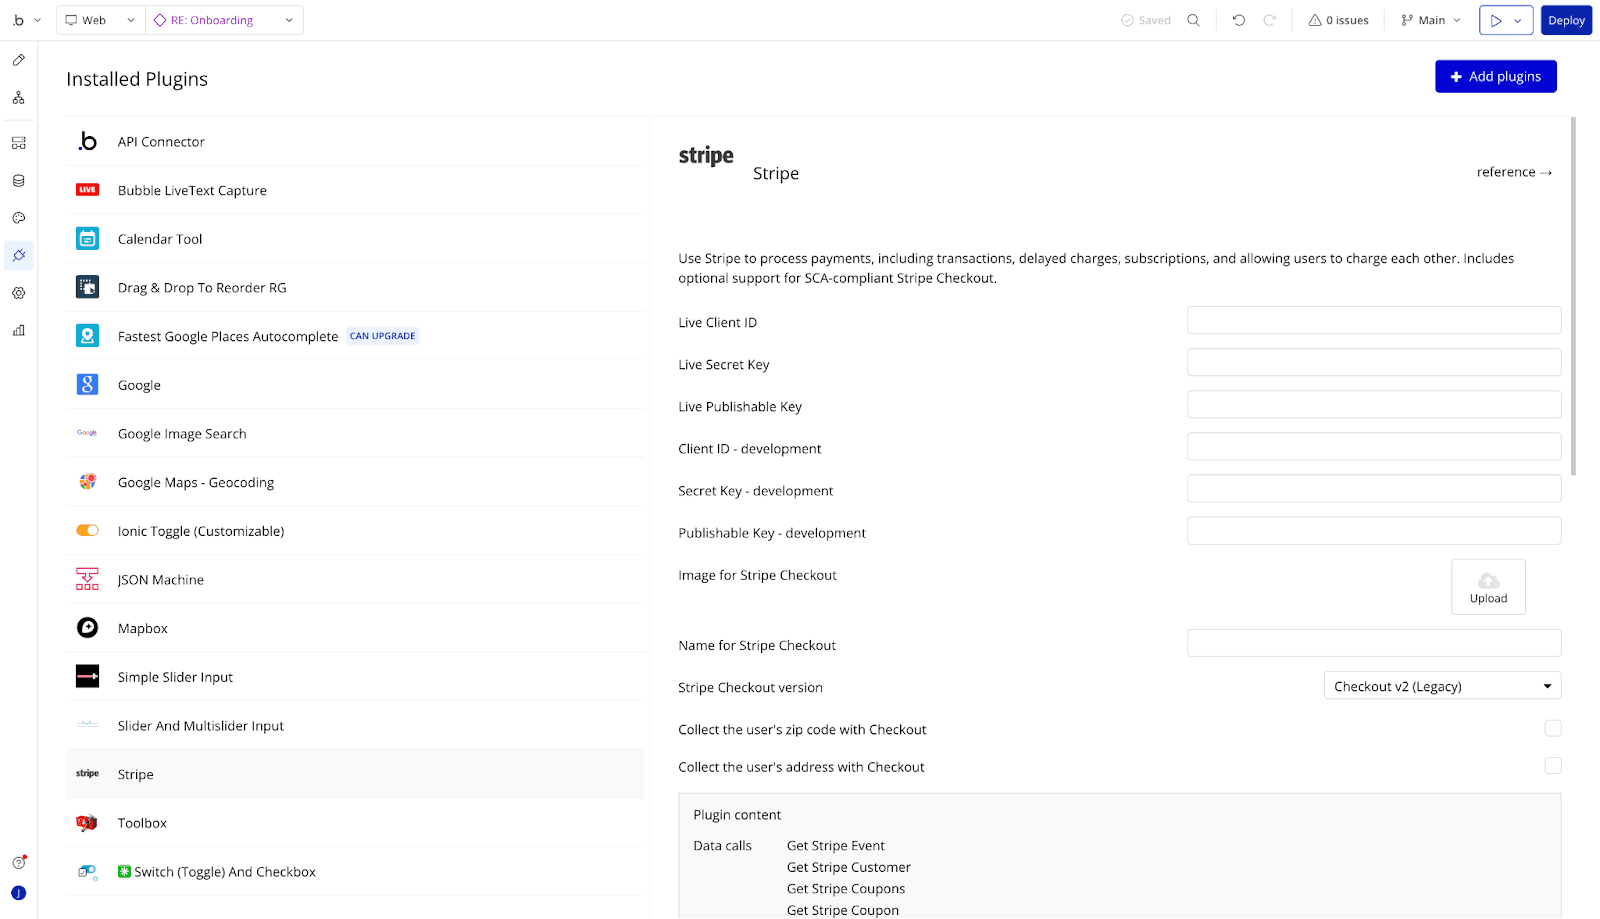
Steps:
Open your Bubble app
Go to the Plugins tab
Click Add plugins
Search for “Stripe”
Choose the official plugin by Bubble and click Install
Paste in your Test Publishable Key and Test Secret Key
Test keys start with pk_test_, sk_test_Live keys start with pk_live_, sk_live_
Bubble automatically switches between test and live mode depending on whether your app is in Dev or Live.
Just make sure to start with test keys. Add live keys only when you're ready to launch.
Book a free consulting call with Goodspeed
Redirects with Stripe Checkout
If you're using Stripe Checkout (Stripe’s hosted payment page), you can control where users go after a successful or cancelled payment by setting redirect URLs in your workflows.
For example:
After success :
https://yourapp.bubbleapps.io/successAfter cancel :
https://yourapp.bubbleapps.io/cancel

You can also manage redirects using Bubble workflows.
But setting these URLs as fallbacks ensures users still land in the right place if your logic ever breaks.
What the Plugin Gives You
Once installed, the Stripe plugin adds three key actions to your workflow editor under the Plugins section:
Charge the current user : for one-time payments
Subscribe the user to a plan : for recurring billing
Collect the user’s card details : for saving a payment method
These actions are the foundation of your payment flows in Bubble.
With your app, Stripe account, pricing setup, and plugin ready, you're all set to start building the actual payment flow.
Creating Payment Workflows in Bubble
Using Stripe Checkout (Recommended for Simplicity)
Once your Stripe plugin is installed and your Product/Price is set up, you’re ready to trigger real payments from your Bubble app.
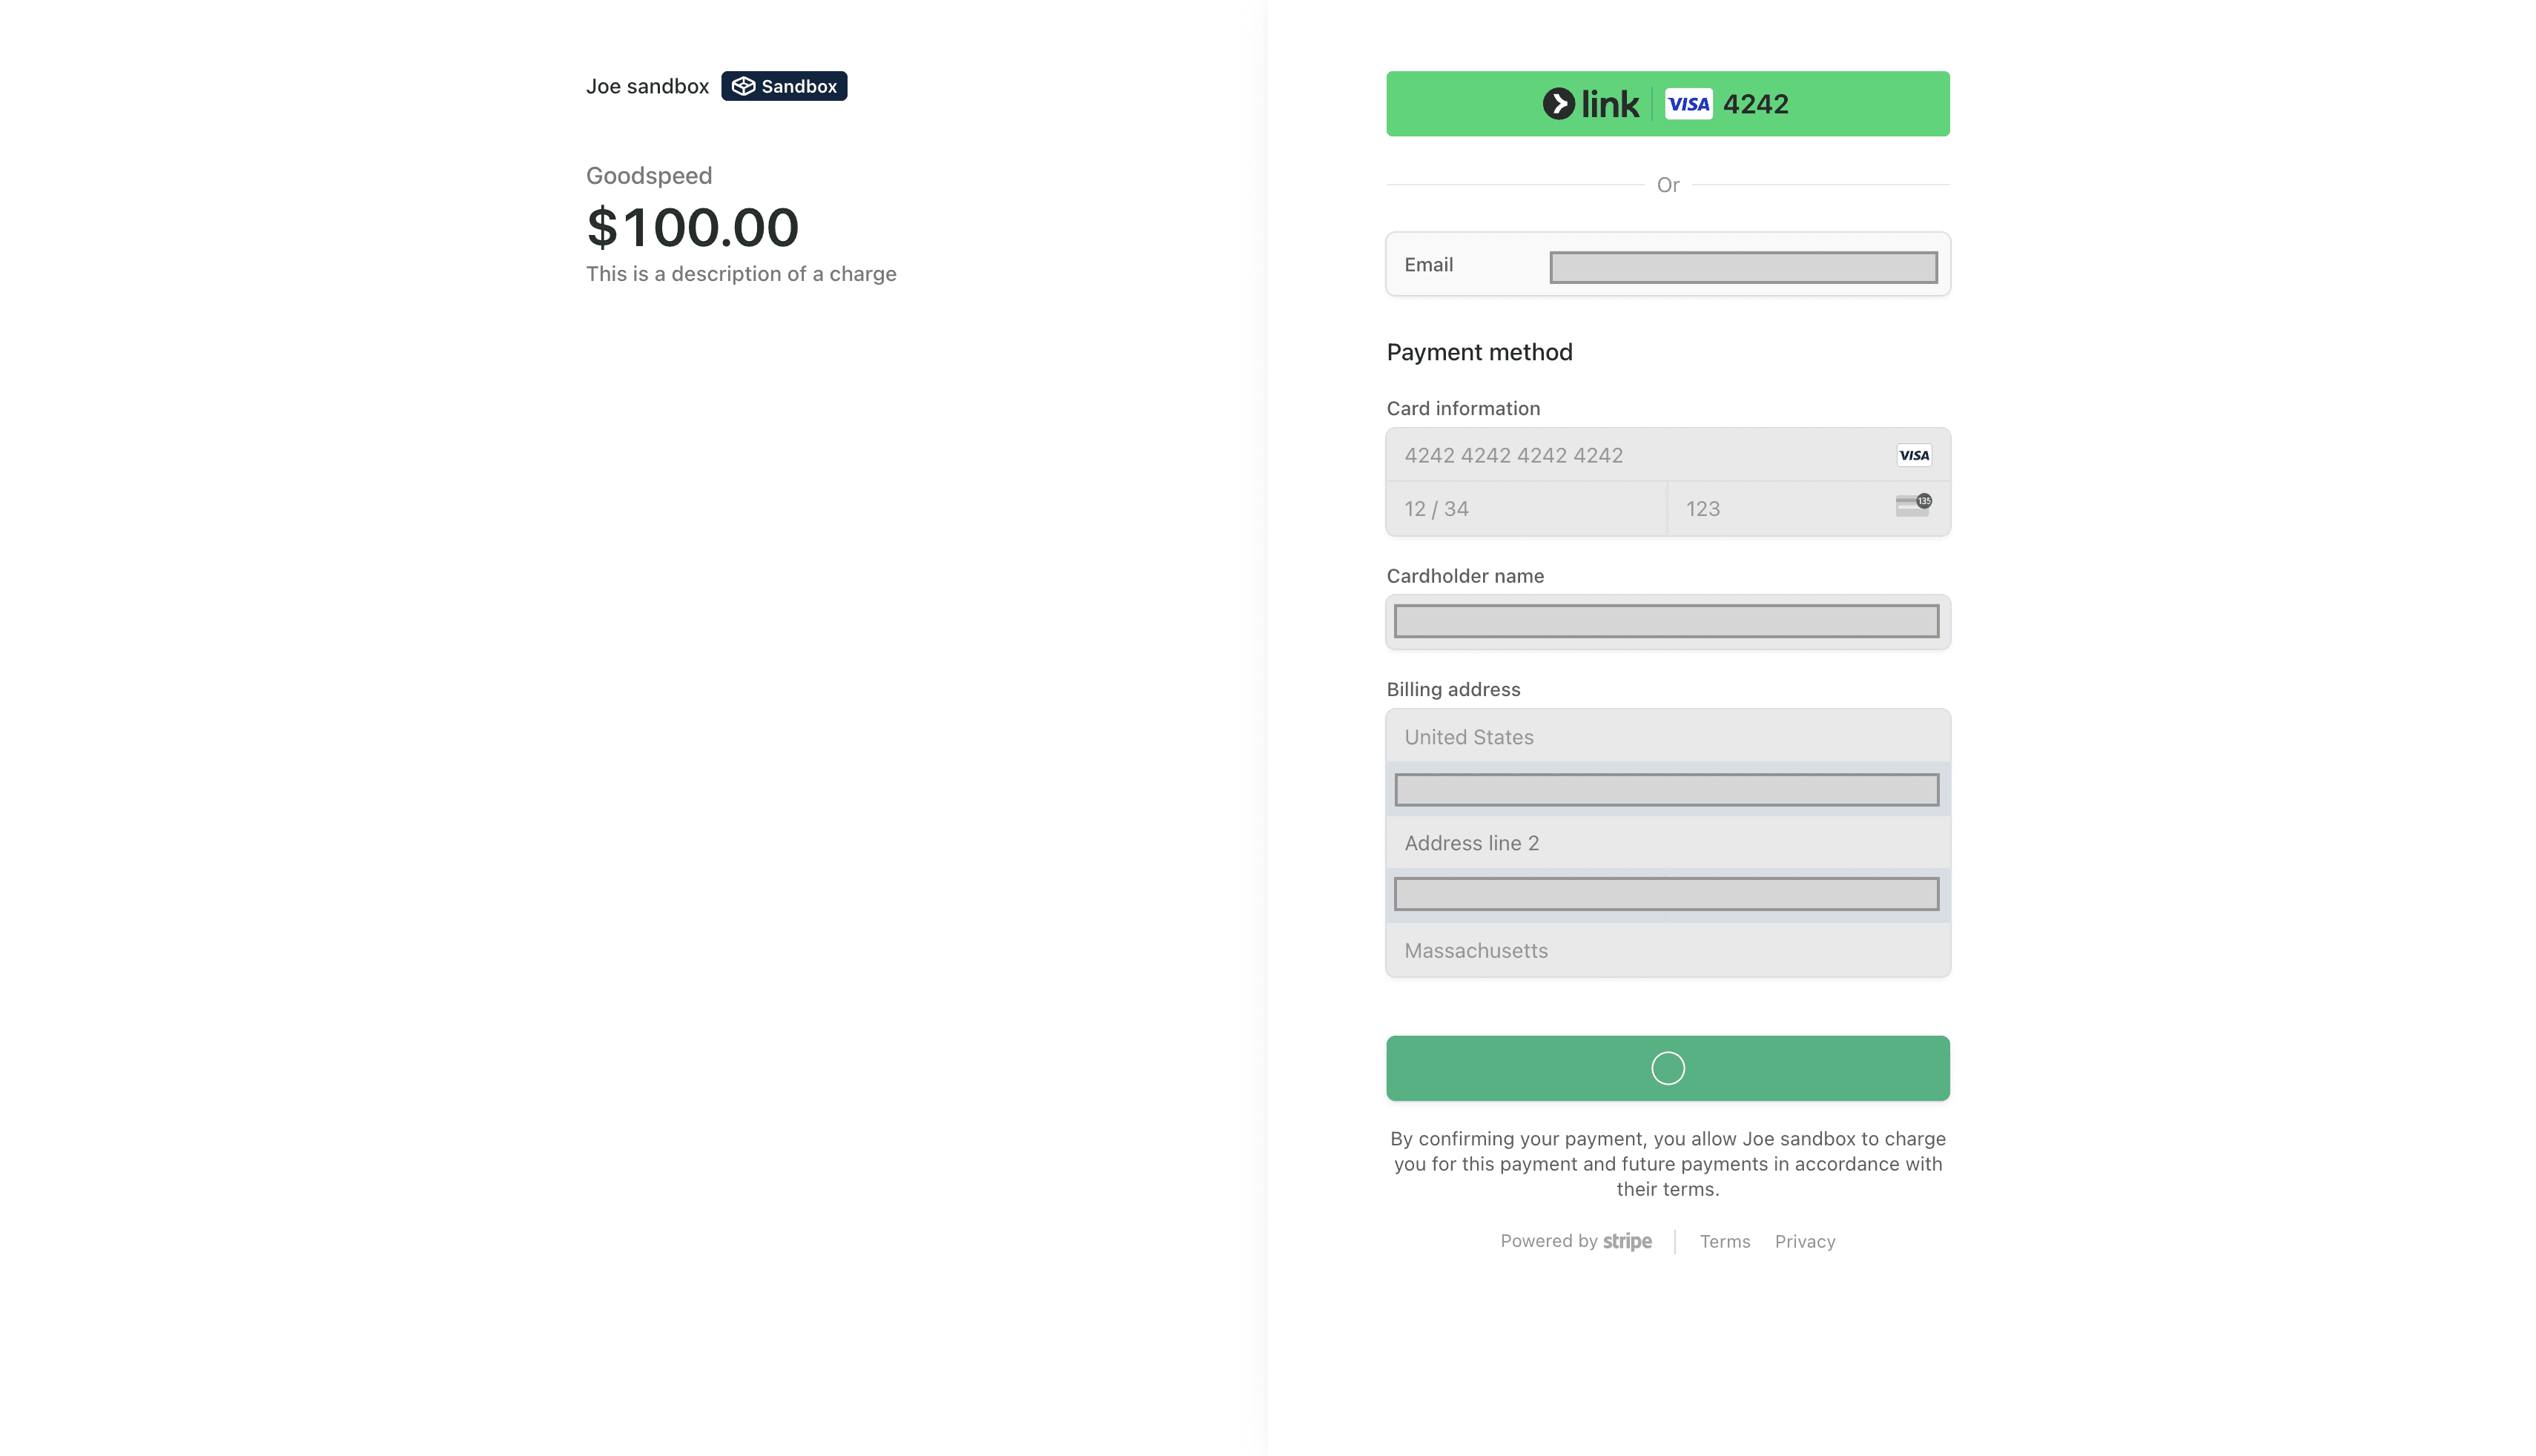
The simplest way is to use Stripe Checkout, a hosted payment page managed entirely by Stripe.
No need to design your own checkout UI, handle card data, or manage redirects manually. Stripe handles it all.
Here’s how to set it up in Bubble:
1. Add a Button to Trigger the Payment
In the Design tab:
Drag a Button onto your page
Label it something like “Subscribe Now” or “Buy for $49”
2. Create a Workflow for That Button
Click the button
Go to Start/Edit Workflow
Add an action:
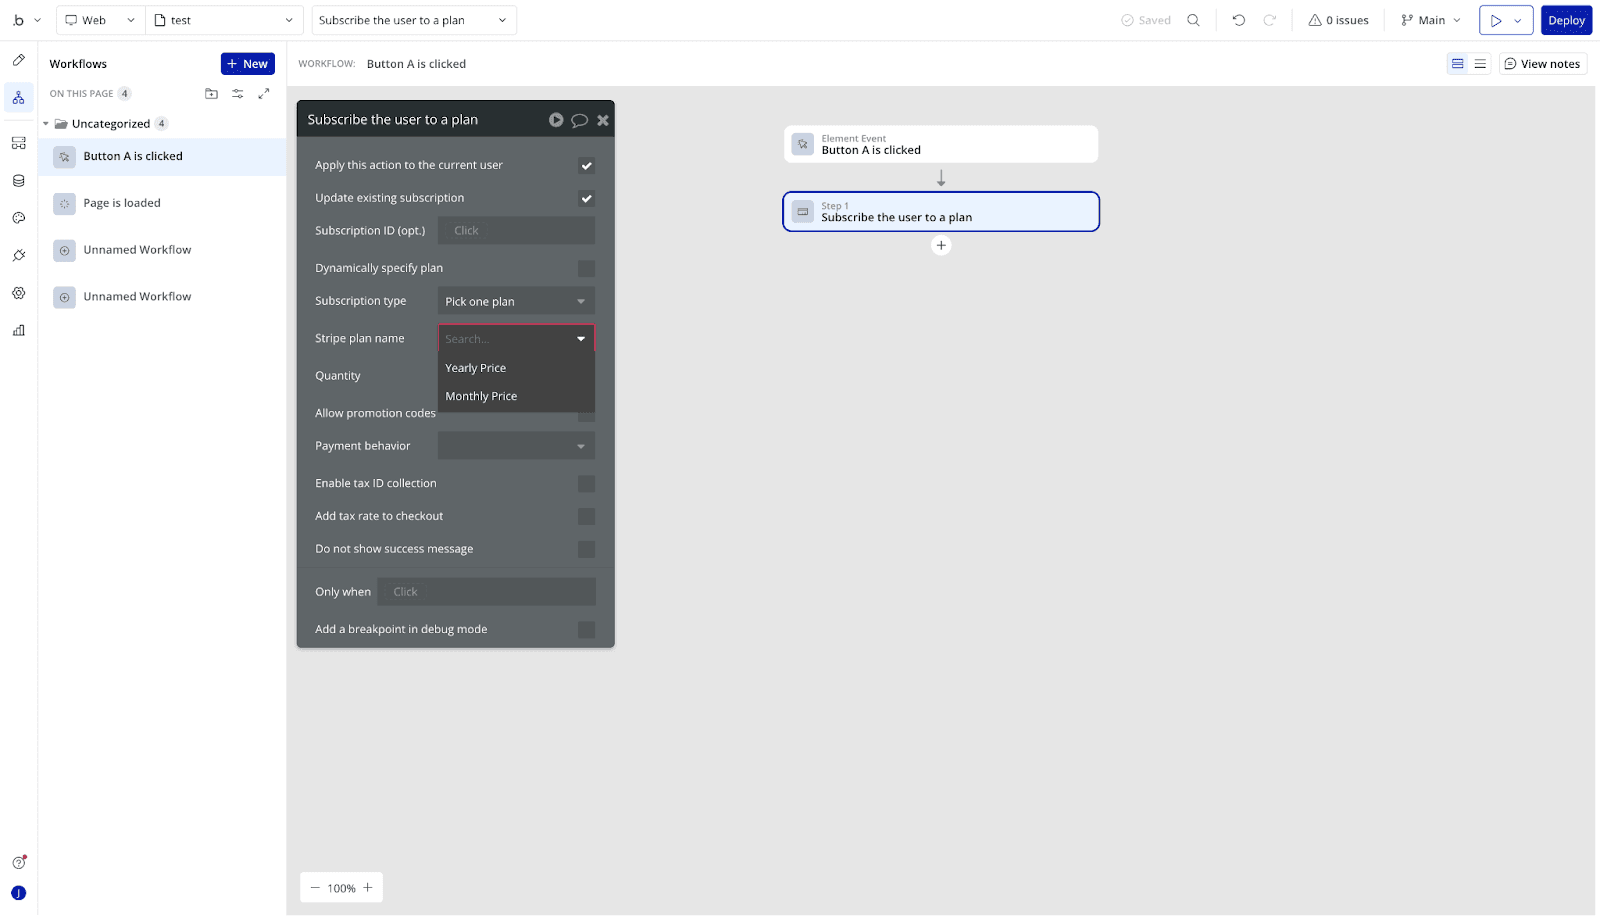
Plugins → Subscribe the user to a plan (for recurring billing)
or Plugins → Charge the current user (for one-time payments)
Choose based on your pricing model:
Use Subscribe the user to a plan if you created a recurring price in Stripe
Use Charge the current user for a one-time payment setup
3. Configure the Action
For Subscribe the user to a plan:
Select the Price from the dropdown (Bubble pulls your Stripe prices automatically)
Choose “Collect the user’s CC info via Stripe Checkout” (If the user doesn’t have a payment method saved, they’ll be redirected to Stripe Checkout)
Set up success and cancel handling through workflows:
Redirect users to a success or cancel page
Or show messages and trigger custom actions based on payment outcome
Optional: You can also pass metadata into Stripe (e.g., user ID, plan type) for easier tracking and reporting.
4. Test the Flow
Preview your app in Dev mode
Click the button → You’ll be redirected to Stripe Checkout
Use a test card like
4242 4242 4242 4242Complete the payment
After payment, Stripe will either:
Redirect the user to your defined success or cancel URL
Or trigger any post-payment workflows you've defined in Bubble
If the payment is successful, Bubble will:
Run any post-checkout workflows (e.g., set user’s plan to “pro”, show confirmation message)
Save the user’s Stripe Customer ID and Subscription ID to the Bubble user object, which you can use later for billing or access checks
What About More Advanced Setups?
The official Bubble Stripe plugin is perfect for most SaaS, membership, and digital product use cases:
One-time payments
Subscriptions
Free trials
Simple checkout flows via Stripe Checkout
It’s fast, secure, and exactly what most builders need to get started.
But if you need more advanced billing logic, like custom checkout UIs, saved cards, multi-vendor payouts, or usage-based billing, you’ll eventually hit the limits.
Book a free consulting call with Goodspeed
Option 1: Custom Payment Flows via API Connector
If Stripe Checkout doesn't give you enough control (e.g. dynamic metadata, full UI customization), you can go straight to Stripe's API using Bubble’s API Connector.
This gives you access to Stripe’s full API, including:
Creating custom Checkout Sessions or Payment Intents
Saving cards for future use
Cancelling or upgrading subscriptions
Usage-based or metered billing
Dynamic amounts and metadata tracking
But it comes with tradeoffs:
You’ll need to define each API call manually
Handle webhooks using Bubble backend workflows or external tools
Map Bubble user data to Stripe objects yourself
Stripe API Docs | CheckoutSession API
Option 2: Use the Stripe.js Plugin (by @copilot)
Stripe.js is a powerful community plugin that brings most of Stripe’s features into Bubble, no raw API calls needed.
It’s ideal for apps that need:
Custom checkout UIs
In-app billing and saved cards
Stripe Connect for marketplaces
Split payments and payouts
If you’re building something like Airbnb, Upwork, or any multi-party platform, Stripe.js is the tool to use.
Comparison: Stripe Options in Bubble
TL;DR
Just want to charge users or start subscriptions fast? Use the Bubble Stripe plugin
Need saved cards, in-app billing, or marketplace features? Go with Stripe.js
Need full control and Stripe-native logic? Use the API Connector
Feature / Use Case | Bubble Stripe Plugin | Stripe.js Plugin | Custom API (API Connector) |
Setup difficulty | Easy | Moderate | Advanced |
One-time payments | Yes | Yes | Yes |
Subscriptions | Yes | Yes | Yes |
Stripe Checkout (hosted page) | Built-in | No | Requires API call |
Custom payment UI | No | Yes | Yes |
Saved cards | Limited | Yes | Yes |
Marketplaces (Stripe Connect) | Yes | Yes | Yes |
Add metadata (e.g. user ID) | No | Yes | Yes |
Webhook support | Optional | Recommended | Required |
Best for... | Simple SaaS / MVPs | Custom billing / marketplaces | Full control / large apps |
Official Stripe Plugin vs. Third-Party Plugins: Which Should You Use?
Bubble gives you three ways to integrate Stripe, and picking the wrong one can mean rebuilding your payment flow later. Each one fits a different stage of product.
The Official Bubble Stripe Plugin
Use it when: You need simple, reliable payments and subscriptions with minimal setup. One-time charges, subscription billing, and Stripe Checkout all work out of the box.
Strengths: Zero configuration beyond pasting API keys. Stripe Checkout handles PCI compliance. Built-in subscription management. Works in test and live mode automatically.
Limitations: No saved cards. No custom checkout UI. No metadata support. No marketplace or multi-vendor payouts.
Best for: MVPs, straightforward SaaS billing, digital product sales, and any app where Stripe Checkout covers your needs.
The Stripe.js Plugin (by Copilot)
Use it when: You need in-app payment forms, saved cards, or Stripe Connect for marketplaces.
Strengths: Custom payment UIs without leaving your app. Saved card management. Stripe Connect support for split payments and payouts. More granular control over the payment experience.
Limitations: More complex setup. Requires understanding of Stripe's client-side and server-side model. May need webhook handling for reliability.
Best for: Marketplace apps, platforms with saved payment methods, apps that need branded checkout experiences, and any product using Stripe Connect.
The API Connector (Direct Stripe API)
Use it when: You need full Stripe API access. Custom Checkout Sessions, Payment Intents, usage-based billing, complex subscription logic, or any endpoint the plugins do not cover.
Strengths: Complete access to every Stripe feature. Full metadata support. Maximum flexibility.
Limitations: You are building the integration manually. Every API call, webhook, and error case is your responsibility.
Best for: Complex billing models, enterprise SaaS, high-volume apps, and teams that have outgrown the plugin options.
How to Decide
Start with the official plugin. It covers 80% of use cases and takes 10 minutes to set up. Move to Stripe.js when you need in-app payments or marketplace features. Use the API Connector only when you need something neither plugin supports.
If you are unsure which path fits your product, a quick architecture review can save you weeks of rework later.
Book a free consulting call with Goodspeed
Building Stripe payments into a Bubble app and want to get it right the first time? Goodspeed has integrated Stripe across 200+ Bubble products, from simple checkout flows to complex marketplace billing. Book a free consultation and let's map out the right approach for your app.
Handling Subscriptions in Bubble
If your product runs on monthly or yearly plans, Stripe’s subscription model paired with Bubble’s plugin makes setup pretty straightforward.
You’ll use Stripe Checkout to start the subscription, and Bubble to control what happens next.
Basic Setup: Start a Subscription
1. Create a subscription price in Stripe
Go to Products → Add product
Name it something like “Pro Plan”
Under Pricing, select Recurring
Choose a billing interval (monthly, yearly, etc.)
Click Save and copy the Price ID
You’ll use this ID in your Bubble workflow.
2. Add a “Subscribe” button in Bubble
In the Bubble editor:
Drag a Button onto your pricing page
Label it something like “Subscribe Now”
Click the button → Start/Edit Workflow
3. Trigger the subscription in your workflow
Action: Plugins → Subscribe the user to a plan
Choose your Stripe price from the dropdown list
Bubble handles the Stripe Checkout redirect and subscription creation behind the scenes.
4. Handle the post-payment experience
If the payment succeeds, Bubble will:
Automatically update the user object with subscription details
Continue the workflow steps you’ve defined
Show a confirmation message
Redirect to the user dashboard
Trigger onboarding steps, etc.
Book a free consulting call with Goodspeed
Going Further: More Control & Best Practices
Once basic billing is in place, here’s how to make your subscription flow more robust:
Store the Stripe Subscription ID
After a user subscribes:
Use the session_id from the URL
Call the Checkout Session API
Extract and store the Subscription ID on the user
This gives you better visibility and enables subscription management later.
Set a plan_expiration_date manually (if no webhooks)
If you’re not using webhooks:
Set a field like plan_expiration_date = Current date/time + 30 days
Use this to trigger reminders, grace periods, or content locking when the date passes
Not as reliable as webhooks, but helpful for simple setups.
Use conditionals for feature gating
Gate content based on the user’s plan or expiration status:
Only show premium content when:
Current User's Plan Price ID is "price_..."Only allow access when:
plan_expiration_date > Current date/time
Subscriptions can get complex fast, but with Bubble’s plugin and a bit of structure, you can manage most SaaS billing needs with minimal friction.
How to Charge Multiple Items with Stripe in Bubble
If your app sells more than one product at a time (think shopping carts, bundled services, or add-on features), you need a way to charge for multiple items in a single transaction.
The official Bubble Stripe plugin handles one-item charges and single-plan subscriptions well. But for multi-item checkout, you will need to use the API Connector to create a Stripe Checkout Session with multiple line items.
How It Works
Stripe Checkout Sessions accept an array of line items. Each line item references a Stripe Price ID and a quantity. When you create the session through Bubble's API Connector, you pass all the items at once, and Stripe renders a single checkout page with everything listed.
Setup in Bubble
Step 1: Set up a Stripe Checkout Session API call in Bubble's API Connector.
Use the endpoint: POST https://api.stripe.com/v1/checkout/sessions
Step 2: Pass your line items as parameters. Stripe expects them in this format:
line_items[0][price] = price_abc123
line_items[0][quantity] = 2
line_items[1][price] = price_def456
line_items[1][quantity] = 1
Step 3: Set the mode to payment for one-time purchases or subscription if all items are recurring.
Step 4: Define your success_url and cancel_url so users land in the right place after checkout.
Things to Know
You cannot mix one-time and recurring items in a single Checkout Session. If you need both, run two separate sessions or use Stripe Invoices.
Each line item must reference an existing Price ID in Stripe. Create your products and prices in the Stripe Dashboard first.
The API Connector approach gives you full control over what appears on the checkout page, including quantities, descriptions, and images.
For apps with dynamic carts (like an e-commerce app), store the cart in your Bubble database and build the line items array from the cart data when the user clicks "Checkout."
Checkout friction costs real revenue. According to the Baymard Institute, the average online shopping cart abandonment rate is 70.22%, based on 50 different studies. Their research also found that the average large e-commerce site can increase its conversion rate by 35.26% through better checkout design alone.
Book a free consulting call with Goodspeed
Need help wiring up complex payment flows in Bubble? Our team has built Stripe integrations for SaaS platforms, marketplaces, and subscription products. Let's talk about your setup.
Handling Webhooks: Keeping Bubble in Sync with Stripe
Stripe handles billing on its side, but Bubble won’t automatically know when:
A user cancels their subscription
A payment fails
A subscription renews or expires
To fix that, you’ll need to set up a Stripe webhook, a way for Stripe to notify your Bubble app when something changes.
What We're Doing
Stripe triggers a webhook event (e.g. subscription canceled)
We catch that event using Bubble’s backend workflows (or via Make/Zapier)
We parse the data (e.g.
event_type,customer_id)We find the matching Bubble user
We update their plan, status, or expiration date
Using Bubble’s Native Backend Workflows (Recommended)
This gives you the cleanest integration, but requires a paid Bubble plan with Backend Workflows enabled.
What You’ll Need:
A Stripe account
A Bubble app with Backend Workflows turned on
Bubble users must store the Stripe Customer ID or Subscription ID
A webhook endpoint that listens to Stripe events
Step 1: Enable Backend Workflows in Bubble
Go to Settings → API
Check “Enable Workflow API and Backend Workflows”
You’ll now see Backend Workflows in the left panel
Step 2: Create a New API Workflow /stripe-webhook
In Backend Workflows, click New API Workflow
Name it:
stripe-webhookSet it to “Detect Request Data”
This lets Bubble automatically capture incoming webhook data and map fields like:
customer_idsubscription_idevent_type
You can also manually parse the full payload by accepting the entire request body as a single object.
Step 3: Add Logic to Handle Events
Inside your workflow:
Find the user where
Stripe Customer ID = customer_idfrom the webhookIf found, add conditions based on the
event_type
Examples:
Event Type | Action |
| Set user’s plan to “free”, lock access, notify user |
| Flag user, show alert, or start a grace period |
| Extend access, reset expiration, or confirm subscription |
Step 4: Set Up the Webhook in Stripe
Go to Stripe Dashboard → Developers → Webhooks
Click “+ Add endpoint”
URL:
https://yourapp.bubbleapps.io/api/1.1/wf/stripe-webhook/initialize(The/initializehelps Bubble detect the structure on the first request)Choose events to listen for (e.g.
invoice.paid,invoice.payment_failed,customer.subscription.deleted)Click Save
Once your webhook fires and Bubble captures the request, remove /initialize from the URL so Stripe sends real events directly to:
https://yourapp.bubbleapps.io/api/1.1/wf/stripe-webhook
Book a free consulting call with Goodspeed
Testing Your Webhook Setup
Option 1: Use Stripe CLI (Recommended for Dev)
stripe listen --forward-to https://yourapp.bubbleapps.io/api/1.1/wf/stripe-webhook/initialize
Then simulate an event:
stripe trigger invoice.payment_failed
Check Bubble logs under Logs → Server Logs
Make sure your webhook ran and the workflow logic triggered properly.
Option 2: Use the Stripe Dashboard
Go to Developers → Webhooks → Your Endpoint
Click “Send test webhook”
Choose a test event like
invoice.paidClick Send test webhook
Make sure your test user in Bubble has the exact Stripe Customer ID that the test webhook sends, otherwise, nothing will update.
Testing Payments in Bubble
Before going live, test your full payment flows in Stripe’s test mode. It behaves exactly like production, but no real money is involved.
Use Case | Test Card Number |
Basic success |
|
Payment declined |
|
3D Secure flow |
|
Full list of test cards: Stripe test card docs
How to Test in Bubble
Make sure your test keys are entered in the Stripe plugin
Preview your app in Dev mode
Trigger a payment or subscription flow
Complete checkout using a test card
Bubble should:
Redirect to your success URL or trigger your defined success workflow
Run any post-payment workflows (e.g. set user’s plan, show confirmation)
Update the user’s data (e.g. Stripe Customer ID, subscription status)
Test Your Webhooks (Optional but Recommended)
Use the Stripe CLI to simulate events and confirm your backend workflows are wired up correctly:
stripe listen --forward-to https://yourapp.bubbleapps.io/api/1.1/wf/stripe-webhook
stripe trigger invoice.payment_failed
This helps you QA your webhook logic - cancellations, failed payments, renewals - before anything goes live.
Test mode is totally safe.
You can click through full payment flows, trigger real-looking emails, and even simulate edge cases without touching real money or users.
Book a free consulting call with Goodspeed
Payments are too important to get wrong. If you want a senior team to handle your Bubble Stripe integration from plugin setup to production, Goodspeed can help.
Stripe's scale speaks for itself. In 2025, businesses running on Stripe processed $1.9 trillion in total payment volume, a 34% year-over-year increase and the equivalent of roughly 1.6% of global GDP. For Bubble developers, integrating with the world's fastest-growing payment infrastructure is a strategic advantage, not just a technical decision.
Going Live
Stripe makes switching to live mode easy, but small mistakes here can block real payments.
Book a free consulting call with Goodspeed
Pre-launch checklist:
Replace test keys with live keys
Go to Stripe Dashboard → Developers → API Keys
Copy
pk_live_...andsk_live_...Paste them into the Live fields of the Stripe plugin in Bubble
Don’t delete your test keys
You'll need them later for testing edge cases.Switch your plugin to live mode
Bubble automatically uses the live keys when you deploy, but check your workflows, especially if you hardcoded price IDs or built custom flows.Use HTTPS
Stripe won’t process live payments over HTTP.In Bubble: Settings → Domain/Email → Check "Enable SSL"
Verify your Stripe account
Go to the Stripe Dashboard and check for any alerts:Business info
Identity verification
Banking setup

Double-check currency, tax, and branding
Set your default currency, statement descriptor, and tax settings while you’re there.
Bubble Security: How Safe Is Your No-Code App?
Let Users Manage Their Own Billing (Stripe Customer Portal)
If you don’t want to build a billing UI from scratch, Stripe has you covered.
Step 1: Enable the billing portal
Stripe Dashboard → Settings → Billing → Customer Portal
Click Configure, then choose:
Cancel subscriptions
Update payment methods
Switch plans
View billing history
Save
Step 2: Trigger the portal from Bubble
Use the API Connector:
POST https://api.stripe.com/v1/billing_portal/sessions
{
"customer": "cus_abc123",
"return_url": "https://yourapp.bubbleapps.io/account"
}
Stripe returns a URL, redirect the user to that.
Step 3: Add a "Manage Subscription" button
In your UI, place a button under account settings → trigger the API call → redirect to the portal.
Customizing Stripe Checkout
Even though it’s hosted, Stripe Checkout gives you solid control.
Add your branding
Stripe Dashboard → Branding
Customize:
Logo (128×128px PNG)
Brand color
Accent color
Statement descriptor (bank label)
Enable more payment methods
Go to Settings → Payment Methods to activate:
Apple Pay / Google Pay
SEPA, iDEAL, Bancontact
Klarna, Affirm
Link (save card for faster checkout)
You must have a verified account and supported region for these.
Set default language and currency
Settings → Checkout Settings
Choose default locale and currency
Enable test mode previews
Customize Checkout Sessions (for API Connector / Stripe.js)
You can add:
customer_emailmode: payment or subscriptionpayment_method_types[]allow_promotion_codes: truemetadata: for tagging sessions
Discounts and Promo Codes
Stripe supports coupons out of the box, no extra logic needed.
Book a free consulting call with Goodspeed
Create a Coupon
Stripe Dashboard → Products → Coupons → New
Choose:
% off
Fixed amount
Duration (once, forever, or N months)
Create a Promotion Code
Products → Promotion Codes → New
Link it to your coupon
Set code (e.g.,
LAUNCH20)Optional: set expiration, usage limits, or customer restrictions
Enable promo codes in Checkout
Just set allow_promotion_codes: true in your Checkout Session.
Supported natively in the official Bubble Stripe plugin
Works for one-time and subscription payments
Can be tested in test mode
Common Pitfalls & Pro Tips
Build an internal billing panel
Quick access = fewer support headaches.
Include:
Stripe Customer ID
Plan and subscription status
Start and next billin
Conclusion
Stripe and Bubble work well together when the setup is done properly. For most apps, the official Bubble plugin with Stripe Checkout covers everything you need: one-time payments, subscriptions, test mode, and going live.
Where it gets more involved is multi-item charges, marketplace payouts, or custom billing logic. That is where the API Connector or Stripe.js plugin comes in, and where the architecture decisions you make early on determine whether your payment system scales smoothly or becomes a source of ongoing friction.
The common mistake is overbuilding. Start with the simplest integration that meets your current needs. You can always layer in complexity as your product grows.
If you want a team that has done this across hundreds of Bubble apps and knows how to structure payments that scale, Goodspeed is here to help. We are a Gold Certified Bubble development agency with a track record across every Stripe integration pattern. Book a call and let's get your billing right.

Harish Malhi
Founder of Goodspeed
Harish Malhi is the founder of Goodspeed, one of the top-rated Bubble agencies globally and winner of Bubble’s Agency of the Year award in 2024. He left Google to launch his first app, Diaspo, built entirely on Bubble, which gained press coverage from the BBC, ITV and more. Since then, he has helped ship over 200 products using Bubble, Framer, n8n and more - from internal tools to full-scale SaaS platforms. Harish now leads a team that helps founders and operators replace clunky workflows with fast, flexible software without writing a line of code.
Frequently Asked Questions (FAQs)
How do I connect Stripe to Bubble?
Install the official Stripe plugin from Bubble's plugin marketplace. Paste your test publishable key and test secret key from Stripe's Developer dashboard. Bubble switches between test and live keys automatically based on your app mode.
Does Bubble support Stripe subscriptions?
Yes. Create a recurring price in your Stripe Dashboard, then use the "Subscribe the user to a plan" workflow action in Bubble. Stripe Checkout handles the payment page and Bubble stores the subscription details on the user.
What is the difference between Stripe Checkout and Stripe.js in Bubble?
Stripe Checkout is a hosted payment page managed by Stripe that handles PCI compliance and UI automatically. Stripe.js (via the Copilot plugin) lets you build custom in-app payment forms with saved cards and Stripe Connect support.
Can I charge for multiple items in one Stripe transaction in Bubble?
Yes, but you need to use the API Connector to create a Stripe Checkout Session with multiple line items. The official plugin only supports single-item charges and single-plan subscriptions.
How do I handle failed payments in Bubble?
Set up a Stripe webhook for the invoice.payment_failed event. In Bubble's backend workflows, catch that event and update the user's status, for example flagging the account, showing an alert, or starting a grace period.
Do I need webhooks for Stripe in Bubble?
For basic checkout flows, no. But for subscriptions, you should use webhooks. Without them, Bubble will not know when a payment fails, a subscription cancels, or a renewal processes successfully.
Can I use Stripe Connect with Bubble for marketplace payments?
Yes. The Stripe.js plugin supports Stripe Connect for multi-vendor payouts. For more control, use the API Connector to call Stripe Connect endpoints directly. This is common for marketplace and platform apps.
How do I test Stripe payments in Bubble before going live?
Use Stripe's test mode. Enter test API keys in the Bubble plugin, preview your app in dev mode, and use test card number 4242 4242 4242 4242. Test mode simulates real payment flows without processing real money.


