50+ Framer Sites Launched
Your Dedicated Framer Agency for Scalable Websites
We build premium, professional Framer websites for marketing teams tired of waiting on developers. Custom design from senior Framer developers and designers. Fast iteration. Sites you own.


50+ Framer Sites Launched
Your Dedicated Framer Agency for Scalable Websites
We build premium, professional Framer websites for marketing teams tired of waiting on developers. Custom design from senior Framer developers and designers. Fast iteration. Sites you own.
50+ Framer Sites Launched
Your Dedicated Framer Agency for Scalable Websites
We build premium, professional Framer websites for marketing teams tired of waiting on developers. Custom design from senior Framer developers and designers. Fast iteration. Sites you own.
High-Performance Framer Builds
Why Choose Goodspeed as Your Framer Agency?
Choosing the right Framer agency determines whether your website looks generic or stands apart. We build premium Framer websites designed to impress visitors and convert them into customers.
Framer Experts
50+ Framer sites launched for startups, agencies, and enterprise teams.
Daily Updates
Clear timelines, daily progress, fast answers. No disappearing acts.
Loved by Marketing Teams
Your team publishes and launches without waiting on developers.
Conversion-Focused Design
Every page is built to drive action, not just look good.
CASE STUDIES
Real Results From 50+ Launches
We have helped startups launch MVPs in weeks, scale-ups rebuild legacy systems, and enterprises automate operations. Here is what that looks like.


CASE STUDIES
Real Results From 50+ Launches
We have helped startups launch MVPs in weeks, scale-ups rebuild legacy systems, and enterprises automate operations. Here is what that looks like.
CASE STUDIES
Real Results From 50+ Launches
We have helped startups launch MVPs in weeks, scale-ups rebuild legacy systems, and enterprises automate operations. Here is what that looks like.
Who is this for?
Goodspeed vs Doing it Yourself
We don’t just build products. We become your product team.
Goodspeed Standard
Doing it yourself
Framer Professionals
Learning Curve
We ship fast
Unexpected blockers can eat time
We do all the work
Your dev tickets fill up
High performing & fast website
Risk of low conversions
Fully SEO Optimized
Risk of low SEO ranking
Four Steps to Launch Faster and Smarter
From "I have an idea" to "it's live" — here's how we work.

Foundation + Alignment
We clarify your goals, audience, and metrics. Some projects focus on brand, others on conversion. This step sets the design direction.

Strategic Design
We design for your buyer's journey. Each section builds trust, handles objections, drives action and ultimately increases sales.

Rapid Build
Framer developers enhance your site with built-in performance. It loads fast, looks great, ranks well, and is easy to edit. Most sites launch in 2–4 weeks.

Optimize & Iterate
Launch is just the start. We track performance, identify improvements, and support you. 80% of clients stay on retainer for continued partnership.
Four Steps to Launch Faster and Smarter
From "I have an idea" to "it's live" — here's how we work.
Foundation + Alignment
We clarify your goals, audience, and metrics. Some projects focus on brand, others on conversion. This step sets the design direction.
Strategic Design
We design for your buyer's journey. Each section builds trust, handles objections, drives action and ultimately increases sales.
Rapid Build
Framer developers enhance your site with built-in performance. It loads fast, looks great, ranks well, and is easy to edit. Most sites launch in 2–4 weeks.
Optimize & Iterate
Launch is just the start. We track performance, identify improvements, and support you. 80% of clients stay on retainer for continued partnership.
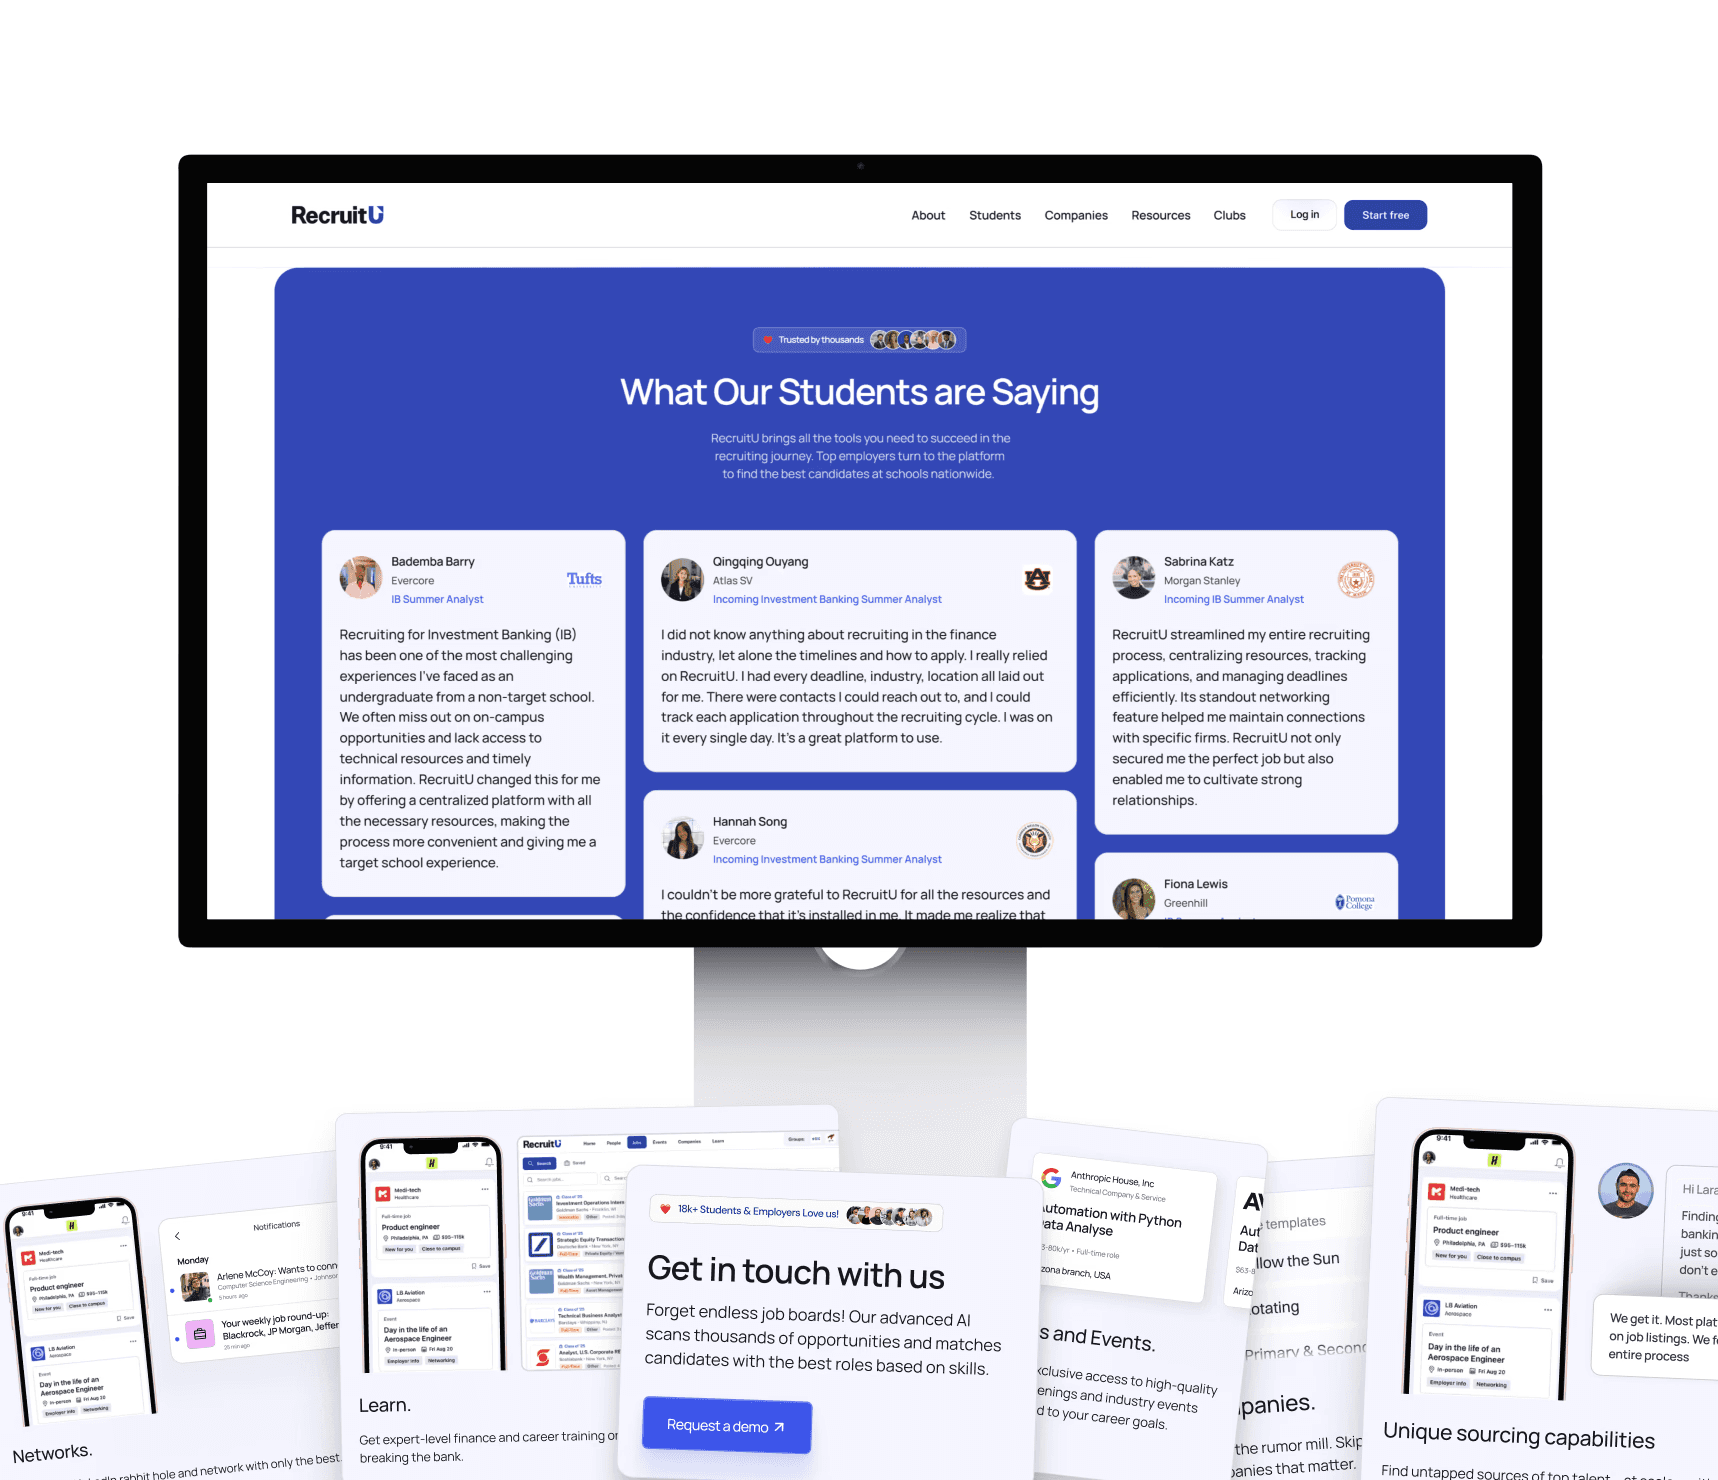
Framer Developer Services
Framer Developer Services
We offer full-service Framer development for startups, scale-ups, and enterprises. Build, optimize, integrate, and scale, everything in one place.

Website Development
Custom Framer sites designed to enhance leads and conversions, tailored for your audience.

Product Landing Pages
High-impact pages for launches that drive action with peak conversion rates.

Framer Migration
Switch to Framer from other platforms. No SEO loss. Smooth transition with no ranking drops.

Speed Optimization
Milliseconds matter. We optimize load times for sub-2 seconds. Faster sites convert higher.

Ongoing Partnership
Retainer packages for ongoing improvement. New pages, A/B tests, and optimization.
Blog
Featured Picks
Where expert and undiscovered voices can share their writing on any topic.


Client Stories

Goodspeed’s ability to think about how to do things in a better and more intelligent way is impressive. They have a new approach to development and design.
Andrew Heath
Founder, SizzleKick

They've helped us bring our vision to life and go live in an extremely compressed time schedule.
Diane Stember
Creative Director, Wisk

It was the best project management service I've experienced working with third-party developers or agencies
Alex Rainey
CEO, MyAskAI

The best thing was their clear communication and the service. We also experienced that they followed up well, and there are no issues fixing things that might crop up after final payment too.
Jon Ensor
Founder, ProMagic

Goodspeed were a brilliant partner throughout the migration. They were fast, responsive, and incredibly easy to work with.
Olivier Mermet
Group Product Manager, Zen Educate

Goodspeed felt like an extension of our team. They provided daily updates via Slack and Loom, so we always knew exactly what was happening and what was coming next.
Gavin Newman
Marketing Manager, Sydecar

They didn't just do what I asked; they wanted to understand and ideate on the product.
Derrick Lewis
Founder, Nuzely

With the prior agency, we were told we couldn't do things. Goodspeed said yes to literally everything and delivered them in a quick fashion.
Davey Owens
CEO, Dwellr

Their speed and ability to produce what was needed through no code was impressive.
Eric
Founder, Bellmade

Goodspeed is very responsive. They made very good suggestions on product design, and were able to comprehend my requirements pretty quick.
Yassine Larbi
Founder, Stratverse

I'm absolutely very impressed with what Goodspeed have put together. The dashboard, the design, the layout, everything about it. It is just absolutely wonderful.
Bryan D’Antonio
Founder, Rank Authority

Most impressive: communication and response to requests - taking work off my plate.
Hugo Bibby
Co-Founder, Pockla
Goodspeed’s ability to think about how to do things in a better and more intelligent way is impressive. They have a new approach to development and design.
Andrew Heath
Founder, SizzleKick
They've helped us bring our vision to life and go live in an extremely compressed time schedule.
Diane Stember
Creative Director, Wisk
It was the best project management service I've experienced working with third-party developers or agencies
Alex Rainey
CEO, MyAskAI
The best thing was their clear communication and the service. We also experienced that they followed up well, and there are no issues fixing things that might crop up after final payment too.
Jon Ensor
Founder, ProMagic
Goodspeed were a brilliant partner throughout the migration. They were fast, responsive, and incredibly easy to work with.
Olivier Mermet
Group Product Manager, Zen Educate
Goodspeed felt like an extension of our team. They provided daily updates via Slack and Loom, so we always knew exactly what was happening and what was coming next.
Gavin Newman
Marketing Manager, Sydecar
They didn't just do what I asked; they wanted to understand and ideate on the product.
Derrick Lewis
Founder, Nuzely
With the prior agency, we were told we couldn't do things. Goodspeed said yes to literally everything and delivered them in a quick fashion.
Davey Owens
CEO, Dwellr
Their speed and ability to produce what was needed through no code was impressive.
Eric
Founder, Bellmade
Goodspeed is very responsive. They made very good suggestions on product design, and were able to comprehend my requirements pretty quick.
Yassine Larbi
Founder, Stratverse
I'm absolutely very impressed with what Goodspeed have put together. The dashboard, the design, the layout, everything about it. It is just absolutely wonderful.
Bryan D’Antonio
Founder, Rank Authority
Most impressive: communication and response to requests - taking work off my plate.
Hugo Bibby
Co-Founder, Pockla
Client Stories
Goodspeed’s ability to think about how to do things in a better and more intelligent way is impressive. They have a new approach to development and design.
Andrew Heath
Founder, SizzleKick
They've helped us bring our vision to life and go live in an extremely compressed time schedule.
Diane Stember
Creative Director, Wisk
It was the best project management service I've experienced working with third-party developers or agencies
Alex Rainey
CEO, MyAskAI
The best thing was their clear communication and the service. We also experienced that they followed up well, and there are no issues fixing things that might crop up after final payment too.
Jon Ensor
Founder, ProMagic
Goodspeed were a brilliant partner throughout the migration. They were fast, responsive, and incredibly easy to work with.
Olivier Mermet
Group Product Manager, Zen Educate
Goodspeed felt like an extension of our team. They provided daily updates via Slack and Loom, so we always knew exactly what was happening and what was coming next.
Gavin Newman
Marketing Manager, Sydecar
They didn't just do what I asked; they wanted to understand and ideate on the product.
Derrick Lewis
Founder, Nuzely
With the prior agency, we were told we couldn't do things. Goodspeed said yes to literally everything and delivered them in a quick fashion.
Davey Owens
CEO, Dwellr
Their speed and ability to produce what was needed through no code was impressive.
Eric
Founder, Bellmade
Goodspeed is very responsive. They made very good suggestions on product design, and were able to comprehend my requirements pretty quick.
Yassine Larbi
Founder, Stratverse
I'm absolutely very impressed with what Goodspeed have put together. The dashboard, the design, the layout, everything about it. It is just absolutely wonderful.
Bryan D’Antonio
Founder, Rank Authority
Most impressive: communication and response to requests - taking work off my plate.
Hugo Bibby
Co-Founder, Pockla
Client Stories
Andrew Heath
Founder, SizzleKick
Goodspeed’s ability to think about how to do things in a better and more intelligent way is impressive. They have a new approach to development and design.
Diane Stember
Creative Director, Wisk
They've helped us bring our vision to life and go live in an extremely compressed time schedule.
Olivier Mermet
Group Product Manager, Zen Educate
Goodspeed were a brilliant partner throughout the migration. They were fast, responsive, and incredibly easy to work with.
Jon Ensor
Founder, ProMagic
The best thing was their clear communication and the service. We also experienced that they followed up well, and there are no issues fixing things that might crop up after final payment too.
Alex Rainey
CEO, MyAskAI
It was the best project management service I've experienced working with third-party developers or agencies
Davey Owens
CEO, Dwellr
With the prior agency, we were told we couldn't do things. Goodspeed said yes to literally everything and delivered them in a quick fashion.
Derrick Lewis
Founder, Nuzely
They didn't just do what I asked; they wanted to understand and ideate on the product.
Gavin Newman
Marketing Manager, Sydecar
Goodspeed felt like an extension of our team. They provided daily updates via Slack and Loom, so we always knew exactly what was happening and what was coming next.
Bryan D’Antonio
Founder, Rank Authority
I'm absolutely very impressed with what Goodspeed have put together. The dashboard, the design, the layout, everything about it. It is just absolutely wonderful.
Yassine Larbi
Founder, Stratverse
Goodspeed is very responsive. They made very good suggestions on product design, and were able to comprehend my requirements pretty quick.
Eric
Founder, Bellmade
Their speed and ability to produce what was needed through no code was impressive.
Hugo Bibby
Co-Founder, Pockla
Most impressive: communication and response to requests - taking work off my plate.
You stop talking about AI. We start shipping it.
We know you don't have time to manage another vendor. Tell us the bottleneck, we tell you the AI fix. Then we ship it, run it, and fine tune it so you can get back to your actual job.

5.0
100+
100+
AI products shipped since 2022
0x
0x
Faster than hiring in-house
10%
10%
Of clients stay past the first project
You stop talking about AI. We start shipping it.
We know you don't have time to manage another vendor. Tell us the bottleneck, we tell you the AI fix. Then we ship it, run it, and fine tune it so you can get back to your actual job.
100%
100%
Of clients stay past the first project
5x
5x
Faster than hiring in-house
100+
100+
AI products shipped since 2021
One team. Strategy through to live product.
Most AI projects break at the handoff between strategy and build. Same team plans, designs, ships, and runs.


One team. Strategy through to live product.
Most AI projects break at the handoff between strategy and build. Same team plans, designs, ships, and runs.
One team. Strategy through to live product.
Most AI projects break at the handoff between strategy and build. Same team plans, designs, ships, and runs.
Book a Free Strategy Call
A quick 20 minute call with our CEO, Harish, to see how we can help you
We've built products featured in
Book a Free Strategy Call
A quick 20 minute call with our CEO, Harish, to see how we can help you
We've built products featured in
Book a Free Strategy Call
A quick 20 minute call with our CEO, Harish, to see how we can help you
We've built products featured in
Calculate How Much Your Site Will Cost
Calculate How Much Your Site Will Cost
Calculate How Much Your Site Will Cost
Frequently Asked Questions
What Makes Goodspeed Different From Other Framer Agencies?
We're Framer Enterprise Experts, one of a small number of agencies globally to hold that accreditation. We have dedicated Framer developers who work in it every day, not generalist web designers who pick it up occasionally. Every Framer site we ship is built for performance, SEO, and easy ongoing editing.
How Long Does It Take to Launch a Framer Site?
Most Framer marketing sites go from design to live in 2-4 weeks. We design in Figma first, then build in Framer with CMS, animations, and SEO configured from the start. If you need a faster turnaround, we can scope a focused sprint around your deadline.
I'm on Webflow or WordPress. Can You Migrate Me to Framer?
Yes. We handle Framer migrations from Webflow, WordPress, and custom-built sites. We rebuild in Framer properly rather than copy-paste, so you get a cleaner codebase, better load times, and a site that's actually editable without breaking things.
Does Framer Handle SEO Properly?
Yes, when set up correctly. Framer supports custom meta tags, Open Graph, sitemaps, and clean URL structures. We configure SEO foundations on every build so you're not starting from scratch after launch. It's not an afterthought for us.
Do You Offer Ongoing Support After the Framer Site launches?
Yes. Most clients stay on a retainer for new page builds, CMS updates, and design iterations. Framer also ships new features regularly, and we keep your site current as the platform evolves.